
|
| Setting up Alerts in Cloudmersive Analytics |
| 11/12/2026 - Brian O'Neill |
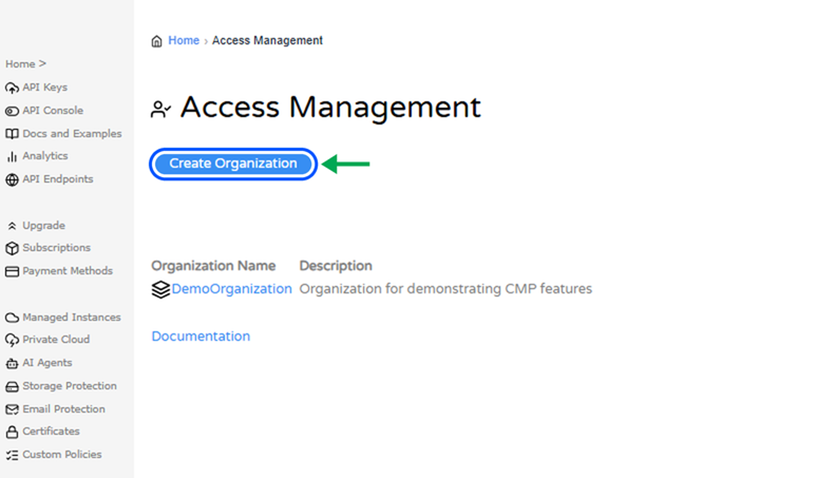
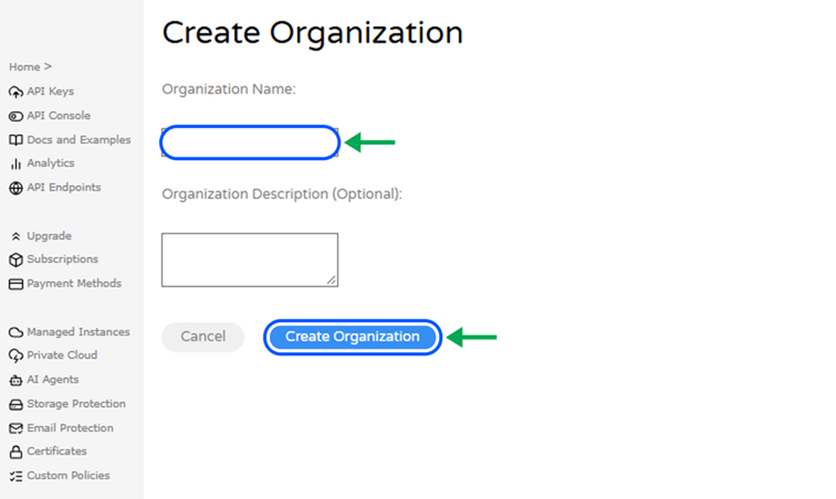
OverviewCloudmersive Alerts email you when something unusual happens in your account. When setting up alerts, you choose which of your Cloudmersive products you want to watch, such as API requests or reverse proxy traffic, and how many matching events in a given time window should trigger your alerts. When the event count crosses your assigned threshold, Cloudmersive sends you an email alert notifying you of the event. It can send another when the alert recovers. Each alert watches one API key or one node. This article walks through the process of creating an alert, testing it, seeing what happens when that alert fires, and some details around managing alerts in the Cloudmersive Management Portal. Alerts belong exclusively to organizations on the Cloudmersive platform, so we’ll start there. Before You Begin: Create an OrganizationTo use alerts, you must be part of an organization. If you haven’t created one yet, open Access Management and select Create Organization (Figure 1).
Enter an Organization Name, add a description (optional), and select Create Organization (Figure 2) to complete the process. You’re now done, and you can add other members to your organization later.
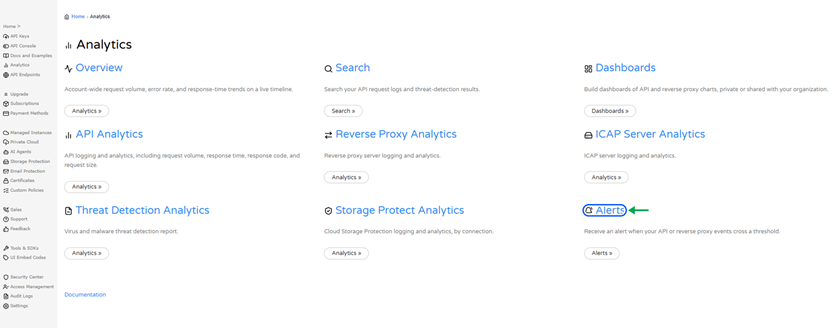
If your enterprise has an existing organization and you’re not yet added to it, be sure to contact your administrator responsible for managing Cloudmersive products. Opening AlertsTo open Alerts in the Cloudmersive Management Portal, select Analytics, and then select the Alerts card (Figure 3).
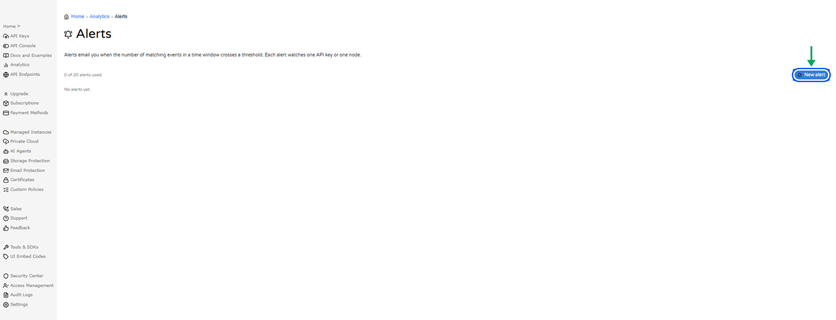
The Alerts page lists any alerts your organization has already created, and it shows how many of your 20 allotted alerts you’ve already used. To start creating a new alert, select New alert (Figure 4).
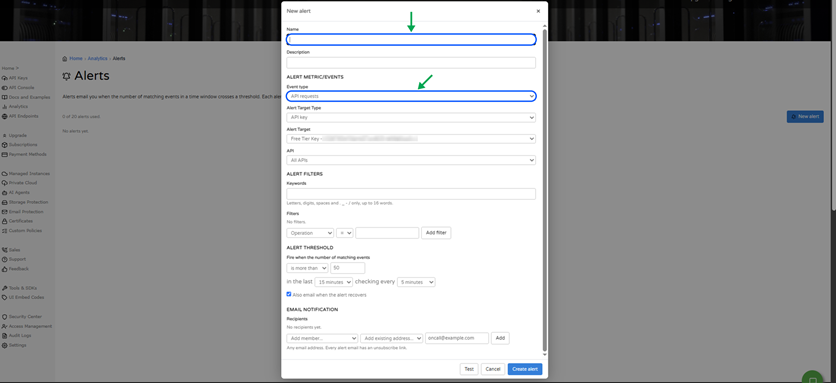
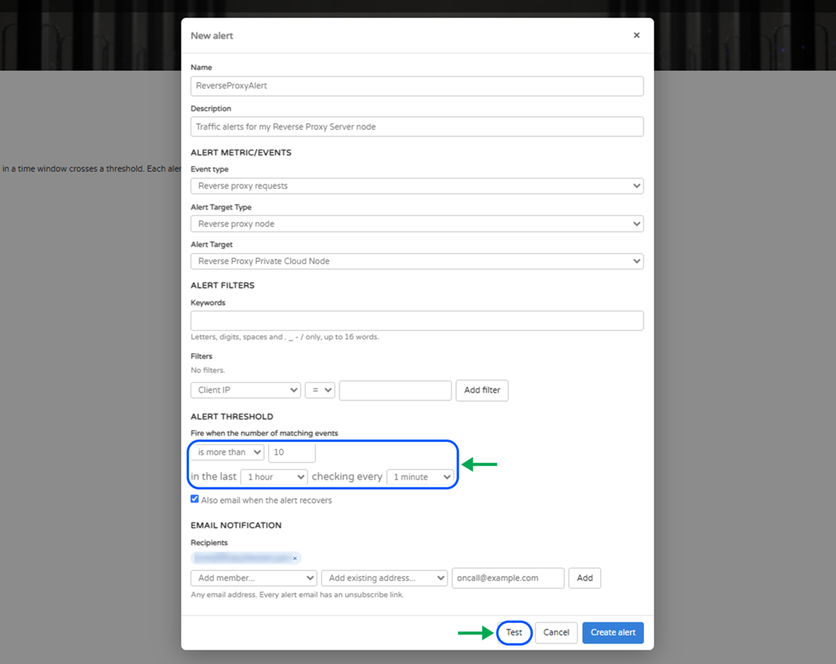
Create an AlertThe New alert dialog has one section for each decision you can make: what to watch, how to filter, when to fire, and who to tell (Figure 5).
Name and DescriptionFirst, give your alert a Name and an optional Description so you can easily recognize it in the list. Choose What to WatchUnder Alert Metric/Events, choose an Event type. Your options are API requests, Threat detections, Virus detections, or Reverse proxy requests. Then choose an Alert Target Type: either API key, Private Cloud node, or Managed Instance. The Alert Target list then shows the matching API keys or nodes on your account. For API requests, the API field lets you pick one or all APIs. Filter the EventsIf you want to count every event in your alert, leave Keywords and Filters empty. Alternatively, you can narrow the alert. Keywords accept letters, digits, spaces, and a few symbols, up to 16 words. A filter compares a field, such as Client IP for reverse proxy requests, to a value. Select Add filter after you enter one to apply it. Set the ThresholdUnder Alert Threshold, choose when the alert fires. In the example shown in Figure 6, the alert fires when there are more than 10 matching events in the last hour, and it checks every minute.
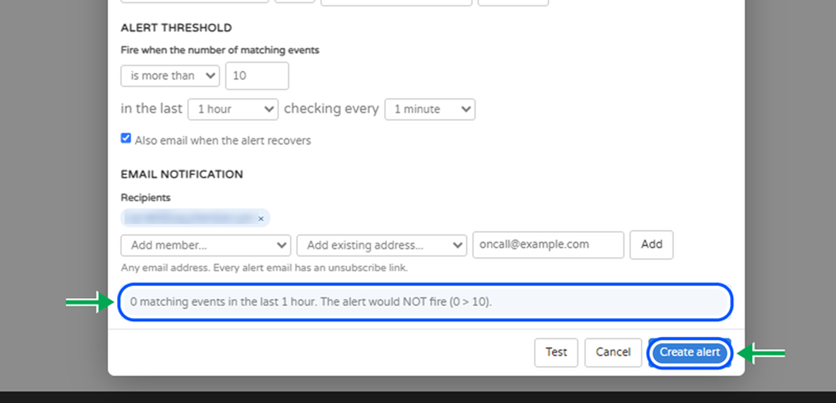
Leave Also email when the alert recovers ticked if you want a second email once the count drops below the designated threshold. Add RecipientsUnder Email Notification, add alert recipients by choosing an organization member, an existing address, or by typing any email address and simply selecting Add. Every alert email includes an unsubscribe link, so members can opt out if they desire. Test and CreateFinally, select Test to check the alert against recent data from your API or node before creating it. A message in the dialog window tells you how many events match your current alert settings and whether the alert would fire based on that data. In our example, there were 0 matching events, so the alert would not fire (Figure 7).
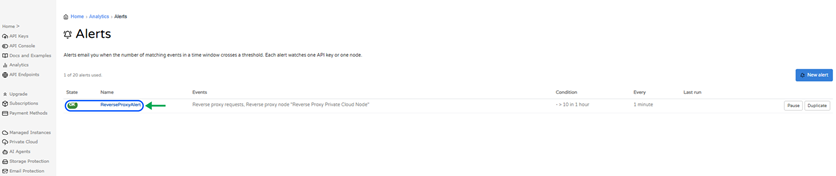
When you’re happy with the settings, select Create alert. The alert then appears in your list with its state, the events it watches, its condition, and how often it runs.
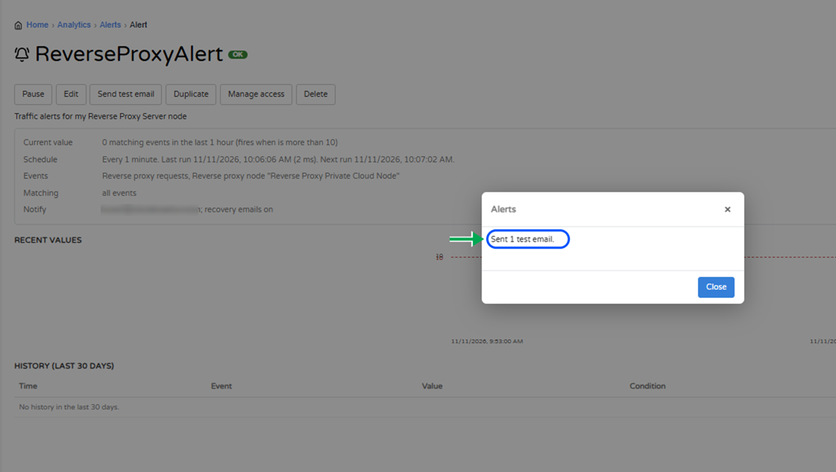
Sending the Test EmailTo send a test email, select the name of the alert you just created to open its page, and then select Send test email (Figure 9). Cloudmersive will then confirm that it sent the email, and you can look for it in your inbox.
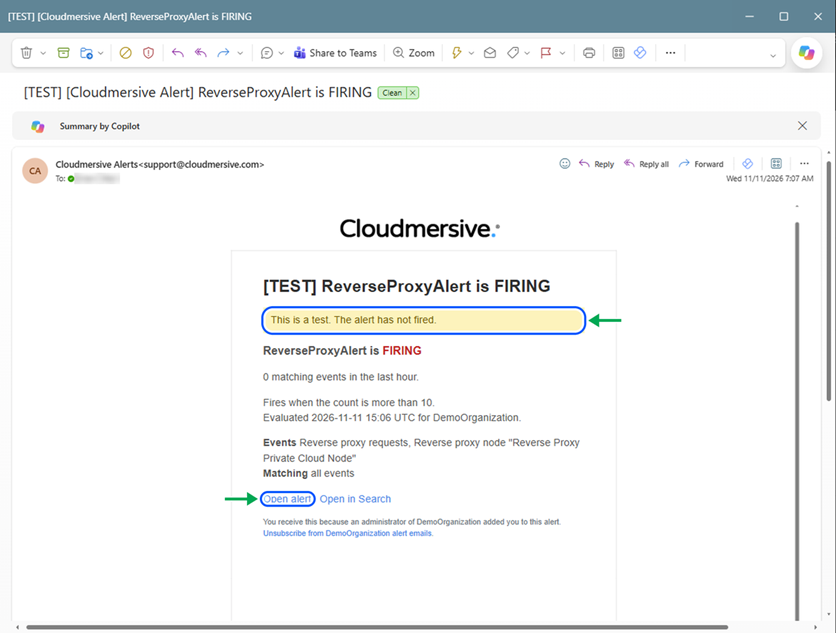
Note that the test email will say the alert is firing, but a banner at the top will state that it’s only a test and the alert hasn’t actually fired (Figure 10). The email also includes Open alert and Open in Search links for your convenience.
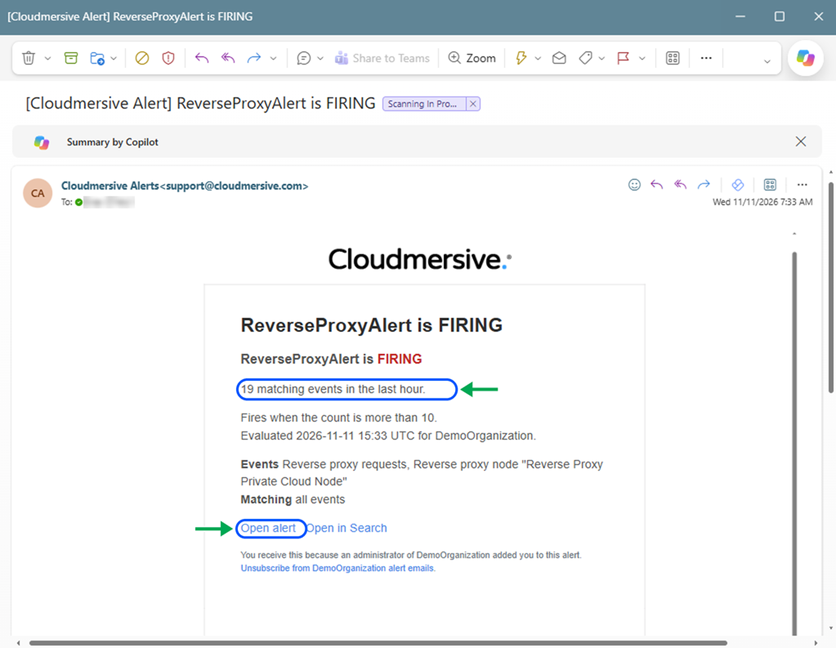
When an Alert FiresWhen the event count passes your assigned threshold, Cloudmersive emails every recipient configured to receive the alert. A real alert email shows the number of matching events, the threshold, and when the alert condition was evaluated (Figure 11).
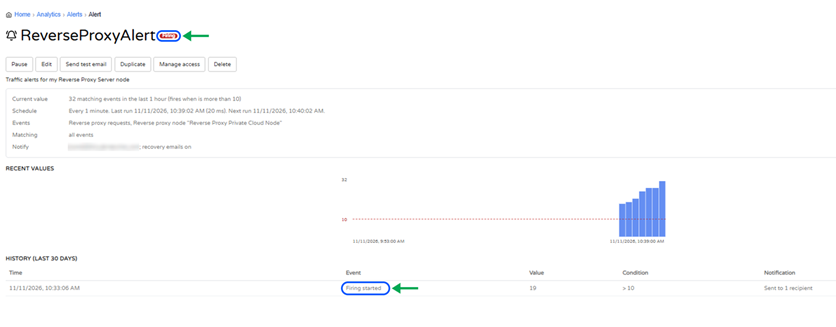
The alert’s page then changes to Firing. It shows the current value, the schedule, the recent values against your threshold line, and a history of what happened and who was notified (Figure 12).
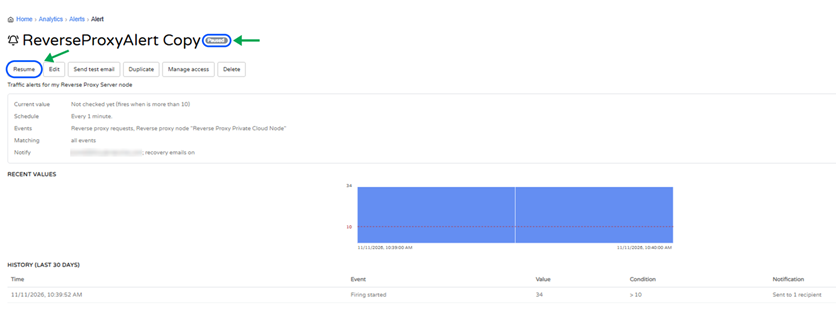
Managing an AlertAfter alerts are created, they can be easily managed and adjusted. The buttons at the top of an alert’s page manage it. If you’d like to adjust your alert, the Edit option opens the same dialog you used to create the alert. To stop the alert temporarily, select the Pause option. This changes the state of your alert to Paused, and the Pause button is replaced by Resume (Figure 13). A paused alert will no longer email you about the event, and it can be resumed at any time. This is not the same as deleting an alert, and the paused alert will still count against your 20-alert allotment.
To create a copy of an alert, select the Duplicate option. The copy will appear immediately with “Copy” added to its name, and Cloudmersive will send a test email automatically to confirm this new alert is up and running (Figure 14).
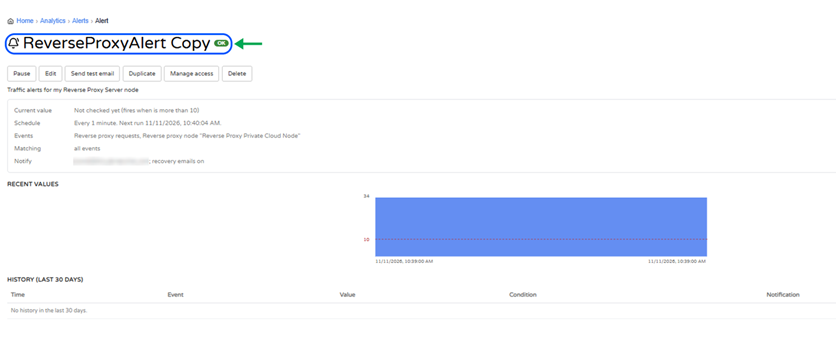
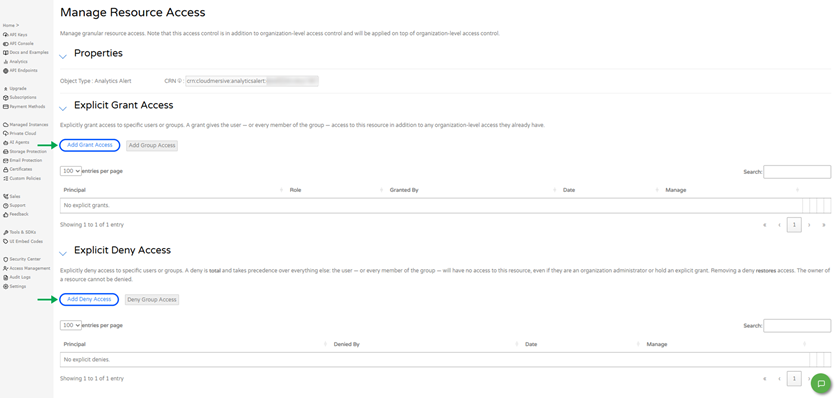
To completely remove an alert, select the Delete option. Note that this operation cannot be undone. Deleting an alert means that alert no longer counts against your 20 slots. Controlling Access to an AlertTo grant and deny various degrees of access to an alert, select Manage access on the alert’s page. This allows you to control who can use it, in addition to your organization’s own access settings (Figure 15).
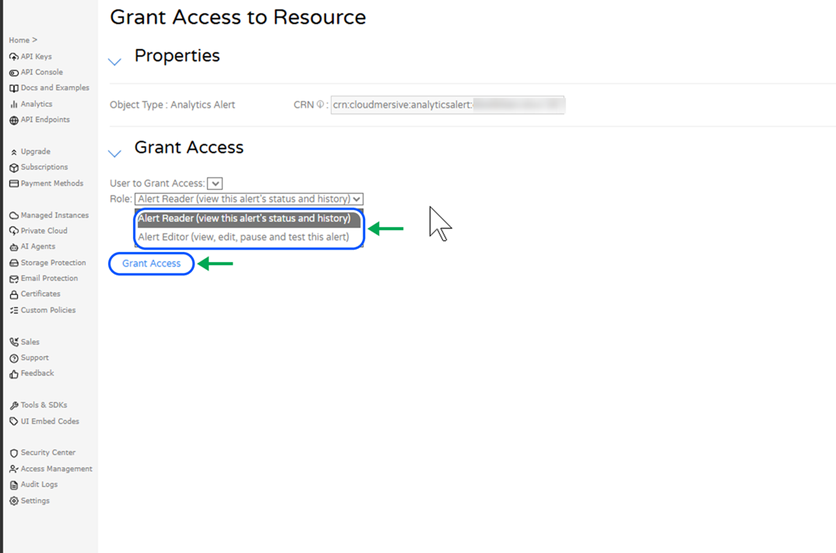
To give someone in your organization access, select Add Grant Access, choose the user to grant access to, and choose a role for that user. Alert Reader can view the alert’s status and history. Alert Editor can also edit, pause, and test it (Figure 16).
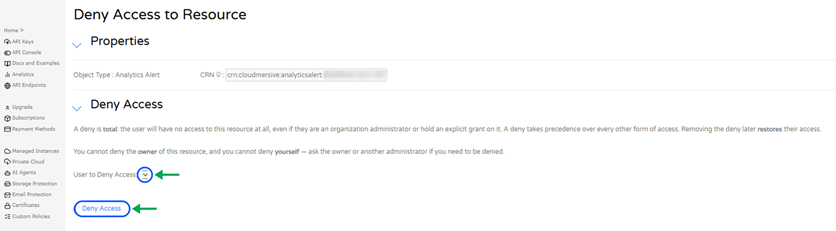
To block someone, select Add Deny Access and choose the user (Figure 17). A deny is total; it overrides every other form of access, including organization administrators, and removing it restores their access. Note that you can’t deny the alert’s owner or yourself.
Limits and NotesAs we’ve noted throughout this article, you can create up to 20 alerts. Alerts require membership of an organization. Learn MoreTo learn more about Cloudmersive Alerts or Cloudmersive Analytics in general, please see our other articles on the Analytics dashboards and reverse proxy analytics. To learn more about Cloudmersive services, please contact your sales representative. |
Jetzt registrieren oder 
 Technische Artikel
 Virenscan-APIs
 Content Disarm and Reconstruction APIs
 Spam-Erkennungs-APIs
 APIs für Dokumentenkonvertierung & -verarbeitung
 Document AI APIs
 Natural Language Processing (NLP) APIs
 Optical Character Recognition (OCR) APIs
 APIs für Bild- und Gesichtserkennung und -verarbeitung